UEFITool allows even novices to edit the UEFI thanks to an easy-to-use interface that provides access to all UEFI tools. With UEFITool, it's very easy to edit and view UEFI and BIOS settings . Data can be imported via image files, and these settings can be viewed and edited as needed. Editing the UEFI is considered a job for experts, but this easy-to-use application allows you to edit it and provides a pleasant interface.
Additionally, the application offers a number of features and compatibility: it supports many BIOS image types, including ROM, BIN, CAP, BIO, FD, WPH, and EFI. These are the most common and standard BIOS image types. You can open and view them in a structured interface where you can see their names and additional information. In terms of functionality, you have access to several excellent UEFI tools. You can extract data from the image and insert elements into the image itself. It's also possible to delete parts of the image that are considered undesirable. And when you're done editing, simply export the image.
The image structure is displayed as a tree of elements with different names, types, and subtypes. When an element is selected, the information available for the selected element is displayed in the information window according to its type and content.
The Messages panel displays all engine messages, including structure warnings and search results. For most messages, you can select the element that triggered the message by double-clicking it.
PC Repair
USB Programmer for BIOS
For each element in the tree structure, a menu can be opened to see what operations are available for the selected element. This includes different operations such as Extract, Insert, Replace, Delete, and Restore.
There are two variants of Extract: Extract as is and Extract body. The difference is that Extract as is extracts the element along with its header (information about its structure such as GUID, size, and attributes is included), while Extract body extracts only the element's data.
Replace has two variants with the same meaning as Extract.
Insert has three variants: Insert before, Insert after, and Insert into. Insert into is only available in the UEFI Volume and Encapsulation sections.
Delete marks the element that should be deleted when the image is rebuilt.
Restore marks the elements that are to be restored when the image is rebuilt. Normally, all elements that are not the subject of reconstruction are left unchanged. If structural errors need to be corrected (e.g., invalid checksums), the elements must be marked and rebuilt manually. When an element is modified, all parent elements up to the root of the tree are automatically marked for rebuilding. If a UEFI volume is marked for rebuilding, all uncompressed PEI files on that volume are also marked for rebuilding. This is because they need to be overflowed into the rebuilt image to maintain the executable limit.
There is also a search function in the File menu, where you can find specific hexadecimal patterns (spaces are not counted, and the period symbol (.) is used as a single-digit hexadecimal placeholder), a specific GUID (the rules are the same as for hexadecimal, except for spaces), and an entire tree of specific text (Unicode or ASCII, case-sensitive or not) can be searched. Search results are added to the message window when one is found.
Once the changes have been made, you must start rebuilding the image using the "Save Image File" command in the "File" menu. If something goes wrong during the rebuild, an error message will be displayed; otherwise, you will be asked if you need to open the reconstructed file. A helpful message may be generated during the rebuild process, but don't rush it; it will disappear if you open the reconstructed file immediately.
Step 1
USB Programmer for BIOS
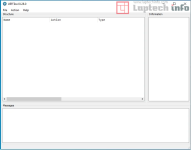
We open the Uefi Tools program
Step 2
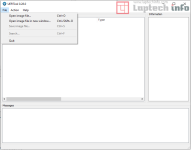
We click on the top left menu where it says File
Step 3
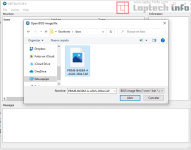
Then click on Open image file and select the .CAP bios file that we have on our computer
Step 4
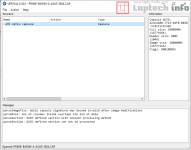
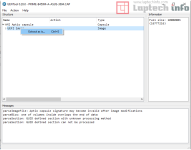
With the BIOS file with the .CAP extension already loaded in the UefiTools program, we just have to left click on where it says AMI Aptio capsule, and another option will drop down
Step 5
In the option that appears that says UEFI image, right-click on it and then click on Extract as is.
Step 6
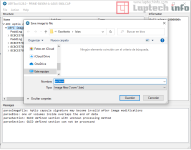
Finally, enter the name you like, click on save and we have our .bin or .rom file ready to program with a USB programmer.
Additionally, the application offers a number of features and compatibility: it supports many BIOS image types, including ROM, BIN, CAP, BIO, FD, WPH, and EFI. These are the most common and standard BIOS image types. You can open and view them in a structured interface where you can see their names and additional information. In terms of functionality, you have access to several excellent UEFI tools. You can extract data from the image and insert elements into the image itself. It's also possible to delete parts of the image that are considered undesirable. And when you're done editing, simply export the image.
How do I use UEFI Tools?
The program window is divided into three areas: Structure, Information, and Messages.The image structure is displayed as a tree of elements with different names, types, and subtypes. When an element is selected, the information available for the selected element is displayed in the information window according to its type and content.
The Messages panel displays all engine messages, including structure warnings and search results. For most messages, you can select the element that triggered the message by double-clicking it.
PC Repair
USB Programmer for BIOS
For each element in the tree structure, a menu can be opened to see what operations are available for the selected element. This includes different operations such as Extract, Insert, Replace, Delete, and Restore.
There are two variants of Extract: Extract as is and Extract body. The difference is that Extract as is extracts the element along with its header (information about its structure such as GUID, size, and attributes is included), while Extract body extracts only the element's data.
Replace has two variants with the same meaning as Extract.
Insert has three variants: Insert before, Insert after, and Insert into. Insert into is only available in the UEFI Volume and Encapsulation sections.
Delete marks the element that should be deleted when the image is rebuilt.
Restore marks the elements that are to be restored when the image is rebuilt. Normally, all elements that are not the subject of reconstruction are left unchanged. If structural errors need to be corrected (e.g., invalid checksums), the elements must be marked and rebuilt manually. When an element is modified, all parent elements up to the root of the tree are automatically marked for rebuilding. If a UEFI volume is marked for rebuilding, all uncompressed PEI files on that volume are also marked for rebuilding. This is because they need to be overflowed into the rebuilt image to maintain the executable limit.
There is also a search function in the File menu, where you can find specific hexadecimal patterns (spaces are not counted, and the period symbol (.) is used as a single-digit hexadecimal placeholder), a specific GUID (the rules are the same as for hexadecimal, except for spaces), and an entire tree of specific text (Unicode or ASCII, case-sensitive or not) can be searched. Search results are added to the message window when one is found.
Once the changes have been made, you must start rebuilding the image using the "Save Image File" command in the "File" menu. If something goes wrong during the rebuild, an error message will be displayed; otherwise, you will be asked if you need to open the reconstructed file. A helpful message may be generated during the rebuild process, but don't rush it; it will disappear if you open the reconstructed file immediately.
Example of using Uefi Tools
How to convert an Asus BIOS file with a .CAP extension to a .BIN file?
Step 1
USB Programmer for BIOS
We open the Uefi Tools program

Step 2
We click on the top left menu where it says File

Step 3
Then click on Open image file and select the .CAP bios file that we have on our computer

Step 4
With the BIOS file with the .CAP extension already loaded in the UefiTools program, we just have to left click on where it says AMI Aptio capsule, and another option will drop down

Step 5
In the option that appears that says UEFI image, right-click on it and then click on Extract as is.

Step 6
Finally, enter the name you like, click on save and we have our .bin or .rom file ready to program with a USB programmer.

